03-01 MessageSource를 이용한 국제화 처리
웹 어플리케이션은 화면에 다양한 텍스트 메시지를 출력한다. 게시글 목록을 보여 줄때 각 칼럼에 '제목', '번호'와 같은 메시지를 사용하고,특정 기능을 성공적으로 수행한경우에도 그 결과를 메시지로 출력해서 알려 주게된다.만약 개발해야 할 어플리케이션이 다국어를 지원해야 한다면, 각 언어에 맞는 메시지가 화면에 출력되어야 할 것이다.
메시지의 국제화를 지원하기 위해 org.springframework.context.MessageSource 인터페이스를 제공하고 있다.아래는 인터페이스 정의한 코드이다.
public interface MessageSource{
String getMessage(String code, Object[] args, Locale locale)
throws NoSuchMessageException;
String getMessage(String code, Object[] args,String defaultMessage, Locale locale)
throws NoSuchMessageException;
String getMessage(MessageSourceResolvable resolvable, Locale locale)
throws NoSuchMessageException;
}
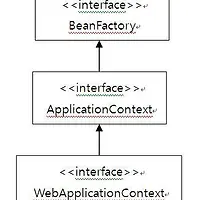
ApplicationContext는 MessageSource 인터페이스를 상속받고 있다. 따라서 위 세가지 메서드를 이용하면 ApplicationContext 로부터 지역 및 언어에 알맞은 메시지를 가져올 수 있게 된다.
ApplicationContext 를 이용하여 메시지를 가져오기위하여 아래와 같이 스프링 설정 파일에 이름이 'messageSource' 인 빈 객체를 정의해 주어야 한다.
<bean id="messageSource" class="org.springframework.context.support.ResourceBundleMessageSource">
<property name="basename">
<value>message.greetion</value>
</property>
</bean>
ResourceBundleMessageSource 클래스는 MessageSource 인터페이스의 구현 클래스로서 java.util.ResourceBundle을 이용하여 메시지를 읽어오는 MessageSource구현체이다.
한 개 이상의 프로퍼티 파일로부터 메시지를 로딩하고 싶다면, basenames 프로퍼티에<list>태그를 이용하여 베이스 이름 목록을 전달하면 된다.
<bean id="messageSource" class="org.springframework.context.support.ResourceBundleMessageSource">
<property name="basenames">
<list>
<value>message.greeting</value>
<value>message.error</value>
</list>
</property>
</bean>
ResourceBundle은 프로퍼티 파일의 이름을 이용하여 언어 및 지역에 따른 메시지를 로딩한다. 예를 들어, message 프로퍼티 파일은 지원할 언어나 지역에 따라 다음과같은 파일명을 갖게 된다.
message.properties:기본 메시지,시스템의 언어 및 지역에 맞는 프로퍼티 파일이 존재 하지 않을경우에 사용된다.
message_en.properties:영어
message_ko.properties:한글
message_en_UK.properties:영국을 위한 영어 메시지
각 프로퍼티 파일에 다음과 같이 동일한 키에 대하여 각 언어에 알맞은 메시지를 포함시킨다.
#message_en.properties 파일
greeting=Hello!
#message_ko.properties 파일
greeting=\uc548\ub155\ud558\uc138\uc694!
※ 자바의 프로퍼티 파일은 유니코드를 이용하여 값을 표시해 주어야한다.
MessageSource빈 객체를 등록했다면, 다음과 같이 ApplicationContext.getMessage()메서드를 이용하여 메시지를 로딩할수있다.
Local locale = Locale.getDefault();
String greeting = context.getMessage("greeting",new Object[0],locale);
Locale englishLocale = Locale.ENGLISH;
String englishGreeting = context.getMessage("greetion",new Object[0],englishLocale);
■ 빈객체에서 메시지 이용하기
빈 객체에서 스프링이 제공하는 MessageSource를 사용하려면 다음 두가지 방법중 한 가지를 사용하면 된다.
1.ApplicationContextAware 인터페이스를 구현한 뒤, setApplicationContext()메서드를 통해 전달받은
ApplicationContext의 getMessage() 메서드를 이용하여 메시지 사용.
2.MessageSourceAware 인터페이스를 수현한 뒤, setMessageSource() 메서드를 통해 전달받은
MessageSource의 getMessage()메메서드를 이용하여 메시지 사용.
MessageSourceAware 인터페이스를 사용하는 법을 살펴보면,
org.springframework.context.MessageSourceAware 인터페이스는 다음과 같이 MessageSource를 전달받을 수 잇는 메서드를 정의하고 있다.
public interpace MessageSourceAware{ void setMessageSource(Messagesource messageSource)}
MessageSourceAware 인터페이스를 구현한 빈 클래스는 setMessageSource()메서드를 통해 전달받은 MessageSource를 이용하여 필요한 메시지를 가져와 사용할수있다.
public class LoginProcessor implements MessageSourceAware{
private MessageSource messageSource;
public void setMessageSource(MessageSource messageSource){
this.messageSource = messageSource;
}
public void login(String username,String password){
...
Object[] args = new String[]{username};
String failMessage = messageSource.getMessage("login.fail",args,locale);
...
}
}
03-02 스프링 컨텍스트 이벤트
ApplicationContext는 이벤트를 발생시킬 수 있는 publishEvent() 메서드를 제공하고 있다.
void publishEvent(ApplicationEvent event)
ㄹ출처] 2. 스프링 DI (스프링 컨텍스트 이벤트)|작성자 외계인셩
org.springframework.context.ApplicationEvent 타입의 객체를 전달받는다.
ApplicationEvent는 추상 클래스로서 다음과 같이 객체를 전달받는다.
public abstract class ApplicationEvent extends EventObject {
...
public ApplicationEvent(Object source) {
super(source);
this.timestamp = System.currentTimeMillis();
}
public final long getTimestamp() {
return this.timestamp;
}
}
ApplicationContext를 통해 이벤트를 발생시키고 싶은 빈은 ApplicationContextAware 인터페이스를 구현한 뒤ApplicationContext를 전달받아 이벤트를 발생시키면 된다.
public class Member implements ApplicationContextAware {
private ApplicationContext context;
public void setApplicationContext(ApplicationContext context) {
this.context = context;
}
public void regist(Member member) {
...
context.publishEvent(new MemberRegistrationEvent(this, member));
}
}
[출처] 2. 스프링 DI (스프링 컨텍스트 이벤트)|작성자 외계인셩
이벤트 클래스는 ApplicationContextEvent 클래스를 상속받아 구현한다.
ㅇ[출처] 2. 스프링 DI (스프링 컨텍스트 이벤트)|작성자ㅇ 외계인셩
public class MemberRegistrationEvent extends ApplicationEvent {
private Member member;
public MemberRegistrationEvent(Object source, Member member) {
super(source);
this.member = member;
}
public Member getMember() {
return member;
}
}
ApplicationContext가 발생시킨 이벤트를 처리할 클래스는 ApplicationListener 인터페이스를 알맞게 구현한다.
[출처] 2. 스프링 DI (스프링 컨텍스트 이벤트)|작성자 외계인셩
public interface ApplicationListener<E extends ApplicationEvent> extends EventListener {
void onApplicationEvent(E event);
}
ApplicationContext는 이벤트 발생시 ApplicationListener 인터페이스를 구현한 빈 객체의 onApplicationEvent() 메서드를 호출함으로써 이벤트를 전달한다.
public class CustomEventListener implements ApplicationListener<MemberRegistrationEvent> {
@Override
public void onApplicationEvent(MemberRegistrationEvent event) {
// 원하는 타입의 이벤트만을 처리.
}
}
ApplicationListener 인터페이스를 구현한 클래스를 빈으로 등록해주면 ApplicationContext가 발생한 이벤트를 전달받아 처리할 수 있게 된다.
<beans xmlns="http://www.springframework.org/schema/beans"
xmlns:xsi="http://www.w3.org/2001/XMLSchema-instance"
xsi:schemaLocation="http://www.springframework.org/schema/beans
http://www.springframework.org/schema/beans/spring-beans-2.0.xsd">
...
<bean id="customEventListener"
class="madvirus.spring.chap03.CustomEventListener" />
</beans>
스프링은 기본적으로 ApplicationContext와 관련된 이벤트를 발생시키고 있는데, 다음과 같다.
※ 스프링 2.5버전까지는 Application 인터페이스에 제너릭이 적용되어 있지 않았기 때문에, 아래와 같이 instanceof 연산자를 이용해서 일일이 이벤트 객체의 타입을 비교했어야 했다.
public class CustomEventListener implements ApplicationListener {
@Override
public void onApplicationEvent(ApplicationEvent event) {
if(event instanceof CustomEvent) {
// 원하는 타입의 이벤트만을 처리.
}
}
}
하지만 스프링 3.0 버전부터는 ApplicationListener에 제너릭이 적용되었기 때문에, 지정한 타입만 처리하는 리스너를 작성할 수 있게 되었다.
정리하면
1. ApplicationEvent를 상속받은 이벤트 클래스를 구현.
2. ApplicationListener 인터페이스를 구현한 클래스를 만들어 onApplicationEvent 메서드를 구현.
3. xml 설정파일에 ApplicationListener 인터페이스를 구현한 클래스를 등록.
4. ApplicationContext의 객체를 생성시켜서 publishEvent 메서드를 통해 이벤트 발생시킴.
'Java > Spring' 카테고리의 다른 글
| form으로 파일 전송 (0) | 2012.06.28 |
|---|---|
| spring + freemarker (0) | 2012.06.22 |
| Spring 3.0 프로그래밍 챕터2 (0) | 2011.05.31 |
| Spring 3.0 프로그래밍 챕터1 (0) | 2011.05.23 |
| XML을 출력하자 (0) | 2011.05.20 |